Hugo is a tool that I have been using for one year for generating static websites. On the contrary to dynamic websites which have a database, static websites are only made of HTML, JS and CSS. There is no scripts executed on the backend (php, python, ruby) and everything is static. In this post, I am giving you the simple deployment workflow I am using to push my sites made with Hugo to a FTP, via Codeship. Codeship is a continuous delivery platform.
A brief introduction to Hugo
Hugo is a static site generator written in Go by Steve Francia (@spf13) and which is currently actively maintained by Bjørn Erik Pedersen (@bepsays) too (and by Anthony Fok too). The framework received a massive following on Github, and it’s one of the most famous Go projects (you might have hear of this other famous Go tool : Docker).

Before my decision to use Hugo (a year back), I tried several other static websites generators. I gave a try to JS-based generator, but I was really pissed off by the building speed. Indeed, with static sites generators (SSG), since you don’t have a script to render single pages in the backend, the philosophy is the following : whenever a change occurs to your content, all the pages of the website should be generated by the tool. Script languages (Python, Javascript) are really too slow at this game.

To my opinion, Hugo’s community is very active, and the discussion forum is really a good place to ask for support. I am a little disappointed by the documentation and the main website though. Finding information is not always obvious for me. Since Hugo is still in it’s infancy, I can imagine that this aspect will be improved soon.
A brief introduction to continuous delivery
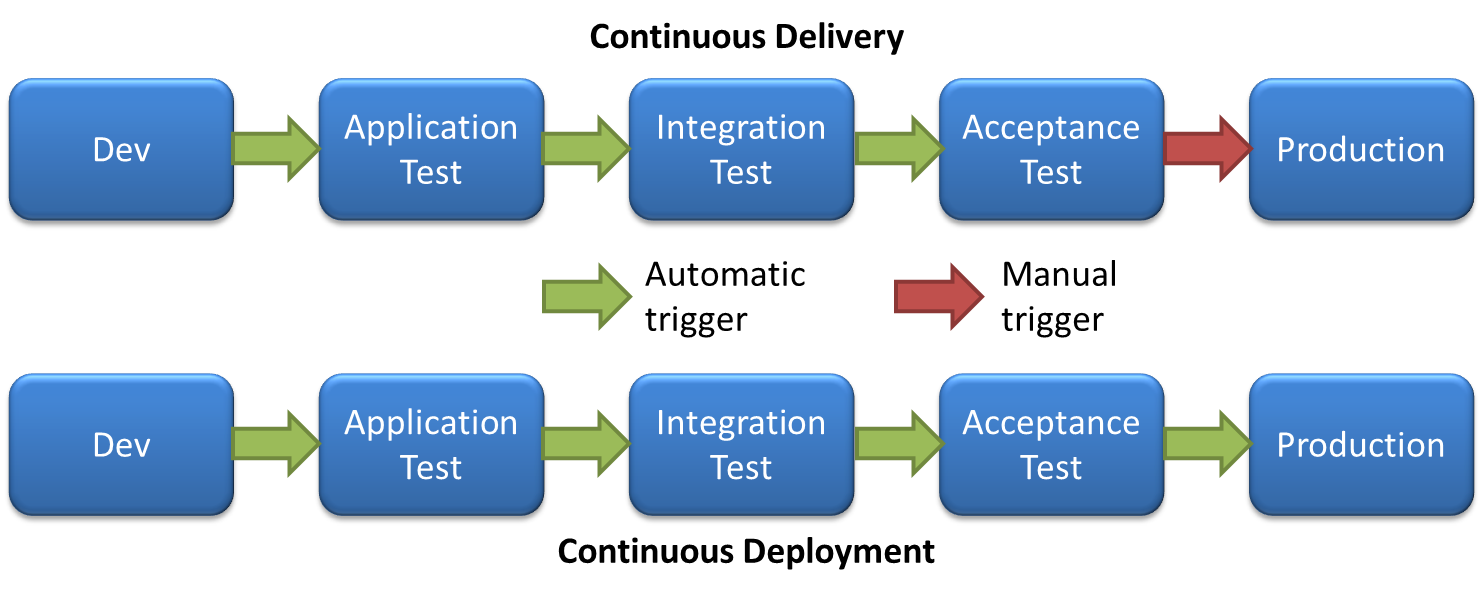
Continuous deployment and continuous delivery are concepts which have been made famous by the lean startup book from Eric Ries (@ericries), and by Agile Software developers. The main idea is that an app or a website should be deployed to a production server whenever it passes a range of tests. I am not going to extend too much on that topic. For those interested, the wikipedia article is a good start, and for those who want to set up their own CI workflow , I recommend this series of posts from Viktor Farcic (@vfarcic) : Continuous Integration, Delivery and Deployment.
There are many CI tools out there. Some of them can be installed on your own servers, others are offered as SaaS. For my first static websites in Hugo, I was relying on Dploy.io. The service is minimalist, really simple, and would fit most of your needs. I still use it for some small projects.
Recently, I had to integrate a more complex workflow and gave Codeship a try. The UI, the UX and the documentation are really polished and I have not yet feel frustrated when using this service (I was not frustrated with Dploy either, it was all a nice experience). There are many alternatives to Codeship out there, the main one being Drone.io.
For the moment, my choice is to work with Codeship and today, I’ll explain you the workflow I am using with Hugo websites. It’s a very easy process, but if you have any questions, please leave a comment below.
Getting started
I assume that you have a working Hugo Website, associated with GIT and that you are hosting your Git repositories remotely (on github or bitbucket for instance).
The first thing you need to do is to create a Codeship account, and create your first project. I’m gonna start a blank project to give you the different step at the time of my writing.
1 - Create a project
Through the “Select Project” at the top left, click on “Create a new Project”
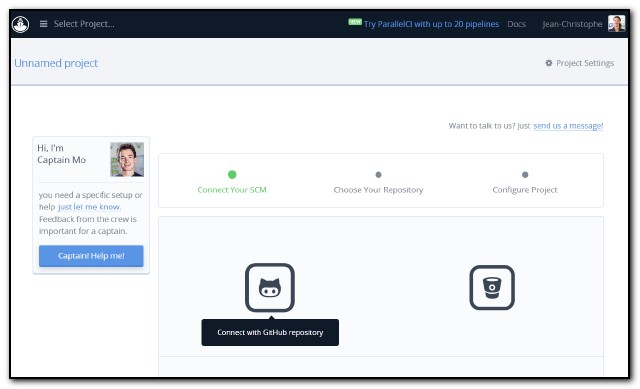
Select your git hosting and when the permissions are transfered you will see a list of your repos. Pick the one corresponding to your Hugo website.
In the last step, Codeship will ask for your deployment and test pipeline commands. Since we don’t know what to put there yet, leave this by default for the moment.
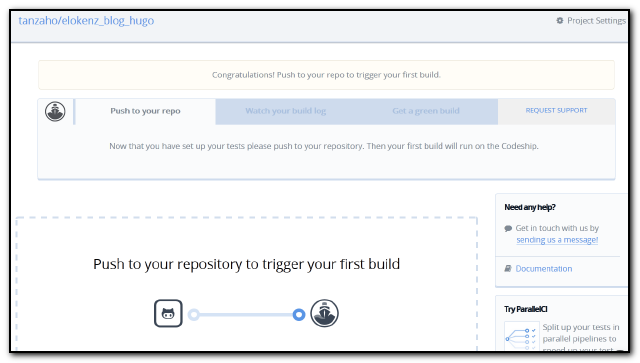
2 - Push something to your repository
Congratulations, your new project is ready. To test the connection to your repository, Codeship suggests to push anything to your repo, just to see the interaction. Try to commit and push anything to your watched repo. Codeship will immediately get called by your repository, and a new build will take place.

A build can be in three states “Running” , “Success” and “Failed”. Each build is associated to a commit (and therefore to a given branch) and the dashboard gives you some more details about the build (such as the build tiome and the date) :

If you click on the status button (running, failed, success), you will get all the details about the given build. This helps when you will need to debug you deployment script.
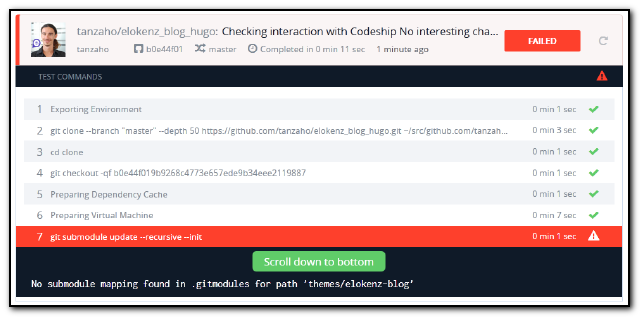
The previous error log was just an example, in you current setup, you should not have an error for your first build.
3 - Prepare the deployment environment
It’s time to head over “Project Settings” to configure the deployment workflow. Here we will just try to do the following :
- Get Hugo from the official repository
- Compile it with Go
- Run hugo on our repository to create the public folder (where all html files are located)
- Push the public folder to our server
There are two important documentation parts here :
RSync is a really nice option to synchronize static files, but that might not be available on a simple FTP server. If I’m telling you this, is because, by nature, static website do not require advanced servers. They might be served by a really simple Apache/Nginx server with no advanced modules. Therefore, people might save a lot of money by serving their sites directly from cheap servers where FTP is the only entry point.
In the following, we will assume that we have access to our server through SSH and that Rsync is available. If you don’t have SSH, please refer to the link -1- above.
3-A Connection to your server
Let’s first prepare our server to accept connections from Codeship.
3-B Deployment script
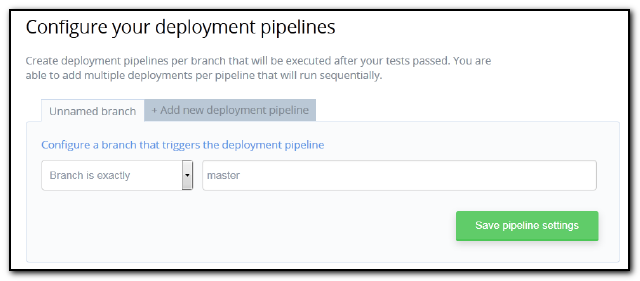
Now it’s time to really use codeship’s power. Head over Project Settings > Deployment. On the Unnamed branch , fill out the field about your branch name. You will probably want to push the master branch of your repo, so it will probably be “master”
Codeship documentation is really well written and organized so you should easily find there what you are trying to do.
Now select the custom deploy script. And copy/adapt the following lines :
# Import Hugo and compile
go get -v github.com/spf13/hugo
# Generate Site with Hugo
cd ~/clone/
hugo
# Send public files to Server
rsync -av -e 'ssh -p 22' ~/clone/public/ user@server:/absolute/path/to/site
Let’s explain what the script does :
go get -v github.com/spf13/hugo: since Go is already installed on Codeship, you can usego getthe official command to import and compile a Go software on your machinecd ~/clone/: on codeship, your repository is pulled into the folder clone. So all your code will be found here.hugo: well, this is the simple Hugo command to build your site using your settings file. This might be adapted if you are using special arguments. The files will be created in the public folderrsync -av -e 'ssh -p 22' ~/clone/public/ user@server:/absolute/path/to/site: Here we are using rsync over ssh. We are cloning Codeship’s folder ~/clone/public to the remote server. user is the user who has set up the SSH key during step 3-A. server is the ip address or URL to your server./absolute/path/to/siteis the path to your website folder.
4 - Deploy your site
Now save all this, and push a new commit to your server. If all goes according to plan, Codeship will import Hugo, compile the executable, launch it against your repo and create the static website. The last step will push every interesting files to your server :
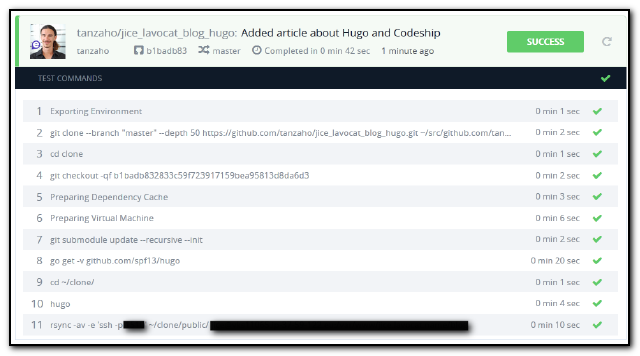
If everything works, you’ll not have to worry anymore.
If you come up with a red Failed status, then try to investigate the error message by viewing the detailed view of the failed build.
You can modify your deployment script and restart the build (no need to additional commit).
Few remarks on continuous integration with Hugo
With this solution, Hugo users do not need to prepare their public files locally and then push them manually to their server. This is really time saving. You can now prepare your articles as drafts, see them on your PC with the --buildDrafts option. If you push them to the repo, they won’t be diplayed on your site since the script is only building non drafts articles. So work on draft, commit as much as you want, and when you need to publish an article, just remove the draft = true from the article metadata.
Read more
If you want to deploy by using Wrecker, checkout this tutorial : http://gohugo.io/tutorials/automated-deployments/