Lambda is one of the many services offered by Amazon Web Services (AWS in short). The tool was built to help developers who need to frequently run small easy tasks, and don’t need a dedicated server (and all the fuss that goes with it) to perform them.
For each new task, Lambda will spawn an EC2 instance and run your task on it. The billing is made relatively to the RAM you allocated to the task, and the time it took to perform. This offers a really interesting and money-saving solution to frequent low-level tasks such as file or stream processing or data analysis.
Along this article, I’ll use image from the official documentation, but the code described is different. The main difference here with the official documentation is the generation of several sizes, and the conversion to a specific image type.
Lambda philosophy
AWS Lambda has the following philosophy : it deals with functions that perform simple tasks and can be triggered by various actors. These triggers could be manual, but the real power comes from the pre-built triggers from other AWS services, like S3, Kinesis, DynamoDB, … these are called event sources and they’re listed in the doc.
If you want to get started , here is the official documentation : http://docs.aws.amazon.com/lambda/
Image conversion in Node.js
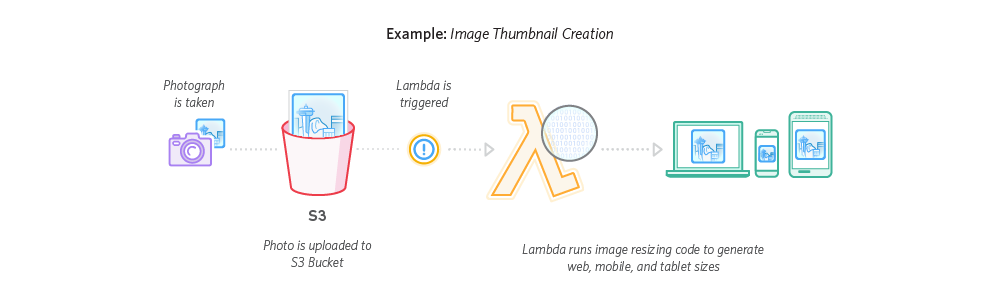
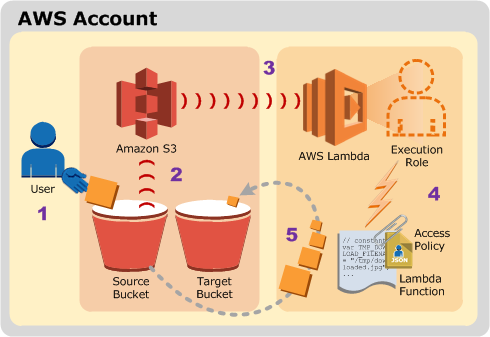
In this post, I’ll describe how to convert images from your AWS S3 bucket on the go and create thumbnails of different sizes. This process is well describe by the diagram I am copying from the official AWS documentation :
At the time of this writing, I am much more familiar to Python than to Node.js. So, you might wonder why this tutorial is about Node and not about Python (which is offered by Lambda). Well, this language has been deployed only recently, and the code I’m going to describe has been written some months ago.
Workflow and code
S3 Buckets
Here we will watch a S3 bucket as input : whenever an image file is uploaded to the folder ‘images’, a Lambda function is triggered and create thumbnails of various size. So, to begin with, be sure to have an AWS account. Create two buckets : the first one will be dedicated to store your raw files while the second one will be storing files after an automatic processing.
The S3 buckets should be created in a zone where lambda functions work (check that beforehand, otherwise you’ll not find the S3 bucket in the list of potential triggers on Lambda). There is a name convention for the second bucket. If you name ‘mybucket’ the first bucket, the second bucket should be called ‘mybucket-output’.
Node modules
Lambda can use Node, Python and Java functions. Each language has its own specifications regarding Lambda. With Node, the idea is to install modules with NPM (they will be stored in a node_modules folder), to have one central script and to pack everything in a zip file (your script and your modules).
In addition to the required libraries (utils and aws-sdk) We’ll use the following modules async for asynchronous executions, path for the image recognition (the script is rather simple, and only use the extension) and gm for the image processing.
If Node.js and NPM are installed on your computer, you can install them directly from the work folder by typing :
# Go to your work folder
mkdir ~/testLambda
cd ~/testLambda
# Install Node modules
npm install utils aws-sdk async gm path
Good, so now you’re ready
Code
Place this script in your work folder, and name it the way you want.
Explanations
So basically the script does the following :
- It first get the metadata from the S3 event that triggered it.
- It get the name of the current bucket and use it to know what the output bucket will be.
- Several thumbnail settings are created
- The image extension is extracted.
- Only files that end with ‘jpg’, ‘gif’, ‘png’ or ‘eps’ are accepted
- Then, for each thumbnail size a sequence of actions is performed:
- We download the image to a buffer
- The image is converted to ‘jpg’ format
- The image is resized The image is uploaded to the output bucket
This code is not optimal since the download and conversion should have been taken outside the for each loop. However, I was not able to achieve that. In case you master NodeJS, I’m interested in a solution to get that step out of the loop.
Lambda configuration
Now, pack the script and the Node modules in a zip archive.
Here are the final step to configure your Lambda function :
- Create a lambda function
- Create a new function using blueprint s3-get-object
- In the event source configuration, select ‘type’ : ‘S3’, in ‘Bucket’ put the name of your first bucket ‘mybucket’. For ‘event type’ select ‘object created’. In ‘prefix’ write ‘images/’. Hit submit
- For the name of the function, put “s3ImageSyncing”, and be sure to keep “Node.js” as ‘Runtime’.
- For the lambda function code, upload the archive app.zip that you got from step 6.
- In ‘handler’, put ‘imageSyncing.handler’
- In ‘Role’, select ‘S3 execution Role’
- Increase the ‘Memory’ to 1024 Mb in advanced settings Hit submit
- Enable the trigger ‘now’. Hit submit
Try it out
Now you should be able to try your function. Upload an image into your source bucket. During the Lambda configuration, we added a filter about the folders to watch, so place the image in a folder called ‘images’. If everything works fine, you should see several new folders in your destination bucket. If that doesn’t work, head over AWS Cloudwatch and try to look at the latest lof file. I tried to included meaningful error messages in the code.
That’s it for today. If you have any question or comment, please, drop a line in the comment box below.